Mobile
Following your subscription with ITHAX©, you will receive e-mails with your login details in your registered e-mail address.
1. Web Portal
- Username:
- Password:
You will receive the following e-mail from admin@ithax.net:
Dear $firstname$ $lastname$,
Thank you for registering with us.
Please make sure you activate your account by a making a payment to us using PayPal (Paypal costs are on us).
Your account is $cardnumber$
You may connect to your ITHAX account using the link and credentials as they will be sent to you following registration:
ITHAX Customer Portal: https://xxx.xxx.xxx/ (for security reasons we do not display the portal domains).
Your username is: $login$
Your password is: $password$
Please use your portal to make payments, check your call records and tariffs, issue technical support tickets and more.
For further inquiries please email us at admin@ithax.net
Kind regards,
ITHAX team
www.ithax.net
Note
You may change your password to combination of letters and numbers but make sure that you keep it above 8 characters long, in order to make it difficult for hackers to recover it.
2. SIP Account credentials for VOIP calls
Once you register with ITHAX© and get your account details, your SIP account credentials will be sent to your registered e-mail account.
- customer account number: XXXXXXXXXXX
- number/SIP account: XXXXXXXXX
- password: XXXXXXXXX
- VOIP domain: [ITHAX server domain and port will be specified inside the registration email]
3. General Notes
- PASSWORDS ARE CASE SENSITIVE!!!
- The username is your ITHAX© number. You may call and be called on it by all ITHAX© users globally FREE OF CHARGE.
- You may dial as usual through the dialpad or directly through your contacts. ALL CALLS SHOULD BE DIALED AS IF THE WERE INTERNATIONAL CALLS. For example a call towards the US should be dialled as +1XXXXXXXXXX or 001XXXXXXXXXX or 1XXXXXXXXXX.
- Calls towards Greece may either be dialled using the long-distance format as above (+30 or 0030 before the local number) or directly using the local number (eg. For a COSMOTE mobile you may call 698XXXXXXXX, or +30698XXXXXXXX or 0030698XXXXXXXX)
- Kindly save all your contacts in the format of “+[country code][local number]”, for easier access.
Be very careful with your SIP account password. If you insert the wrong password 5 times within 10 minutes, the server will block your IP for a day. If you do that twice within two days, you will be blocked for a month. BE EXTREMELEY CAREFULL WITH ITHAX© PASSWORD. You will have to contact admin@ithax.net or use the trouble ticket facility inside the Customer’s Portal.
4. Setting up your phone to work with ITHAX
For Android phones, one can easily setup the native phone app to work with ITHAX. This is absolutely free of charge and you will not need to use any additional application in order to enter the amazing world of ITHAX. Naturally, this way, calling over the native phone app, we avoid sound routing issues (bluetooth etc) and we maintain full functionality over earpieces (volume buttons etc) and car-kit bluetooth connections.
However there are numerous softphones available in the market, most of the free of charge. We have tested vigorously many of them and we are proposing a few below which work fine. In the case of iOS, that is, iPhone and iPad, the softphone that we will select has to be able to work with Push Notifications. If there is no such option, the iPhone will not be able to receive calls when in sleep mode. Acrobits and Groundwire are two applications from the same vendor that work excellently with iOS. They also work perfectly in android phones (Acrobits, Groundwire) and are the recommended solution together with Zoiper for all operating systems. GS Wave is another excellent application, especially for android phones. This application includes codec G729 for free, which is a paid option in the above applications. Very good and stable, highly recommended for all those who do not wish to spend an extra buck, in order to gain access to the magic of ITHAX.
The downside of the first two is that they are paid solutions.
One other thing that one should look for, is the incorporation of codec G729. This codec only consumes 8kb/s bandwidth, which makes it extremely efficient. However in most cases it is a in-app purchase and not cheap at all, in the region of $9-$10. For heavy users however it is a MUST.
There more and more applications that offer G729 codec for free, like the GS Wave and PortGo softphone. Acrobits are also offering G729 codec for free now, since it has now become a free-from-patent codec.
Naturally there is a plethora of softphones available, one can make a thorough search and decide.
ITHAX© will soon be launching our own softphone for all mobile platforms, but until then all available apps will work fine with ITHAX© servers.
1. Android native phone app
- Open your phone app
- Select Settings from the three dots menu
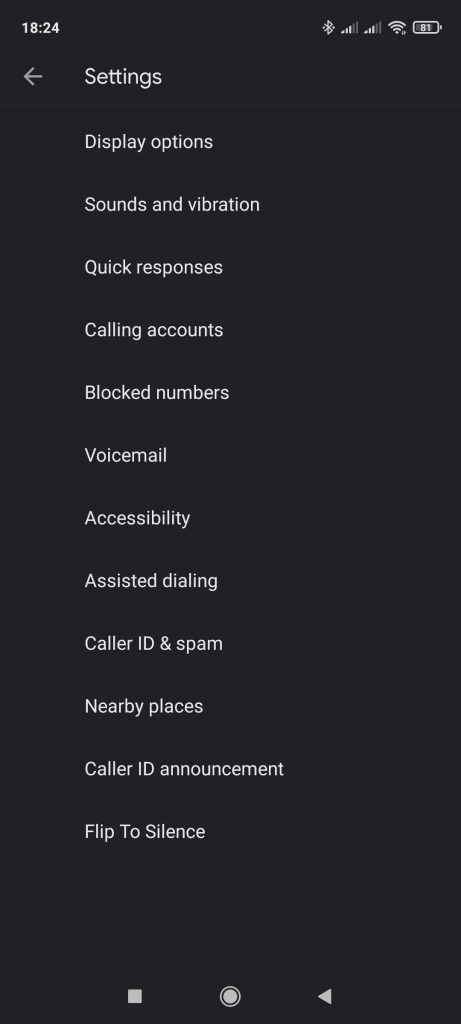
- Select Calling Accounts
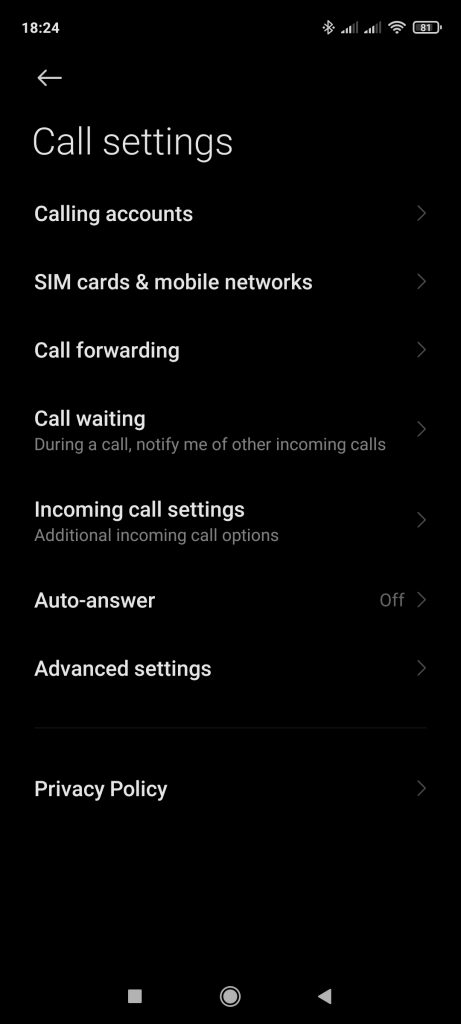
- Select Advanced Settings
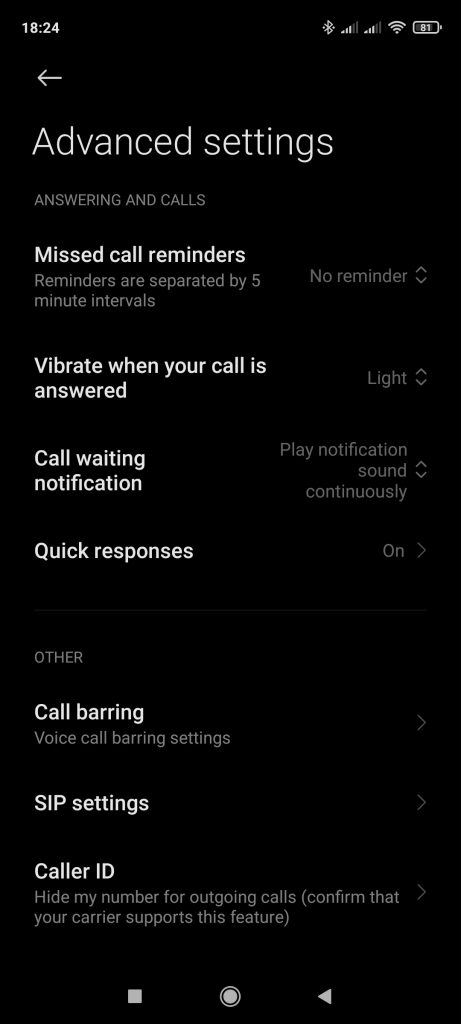
- Select SIP Settings
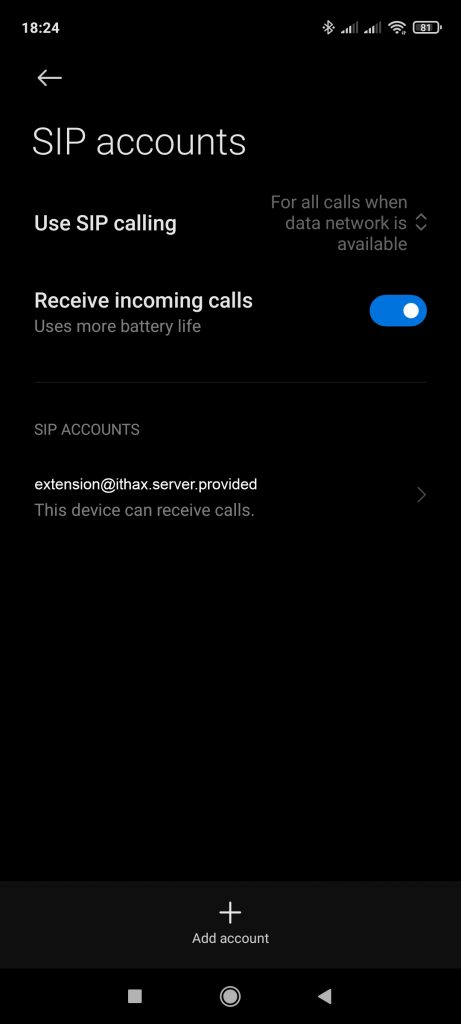
- Add account. Username, Password, Server and port will be sent to you following registration. Enter them at the respective fields. Make sure that “Turn on” is set to “ON”
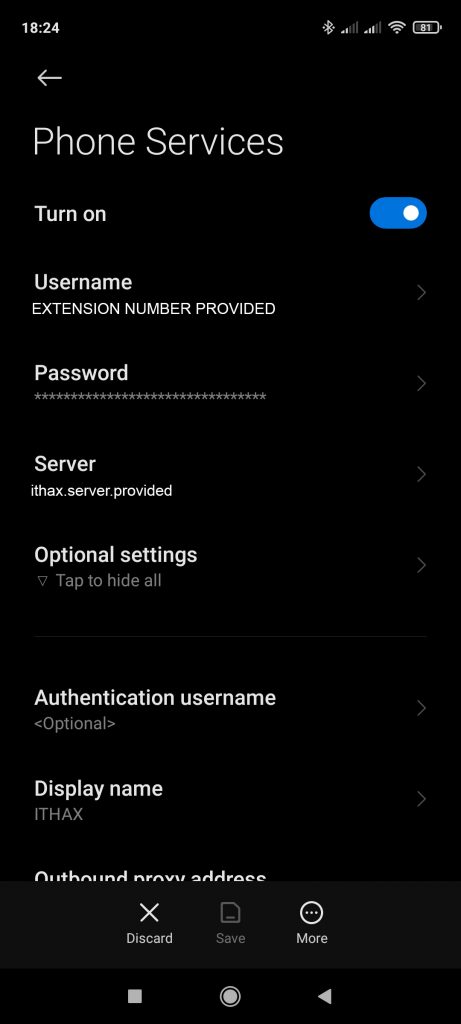
- Enter credentials as they will be sent to you after registration (see above) and press Optional Settings
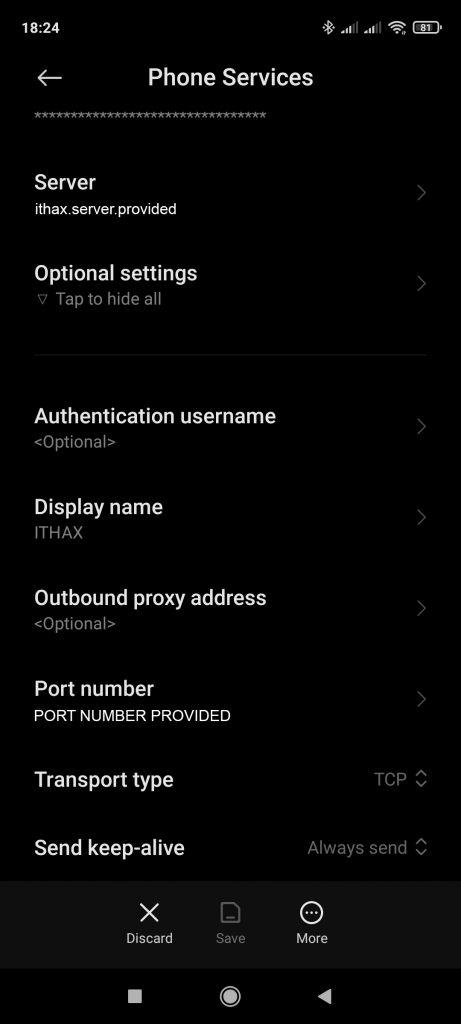
- Set Display Name to ITHAX and set port number to the number that will be sent to you following registration.
- Select UDP or TCP as your transport type (default is UDP)
- Set “Send keep-alive” to “Always send“
- Go back to the SIP settings screen and switch on “Receive incoming calls”
- Go back to call settings screen, after you save, and select Calling Accounts
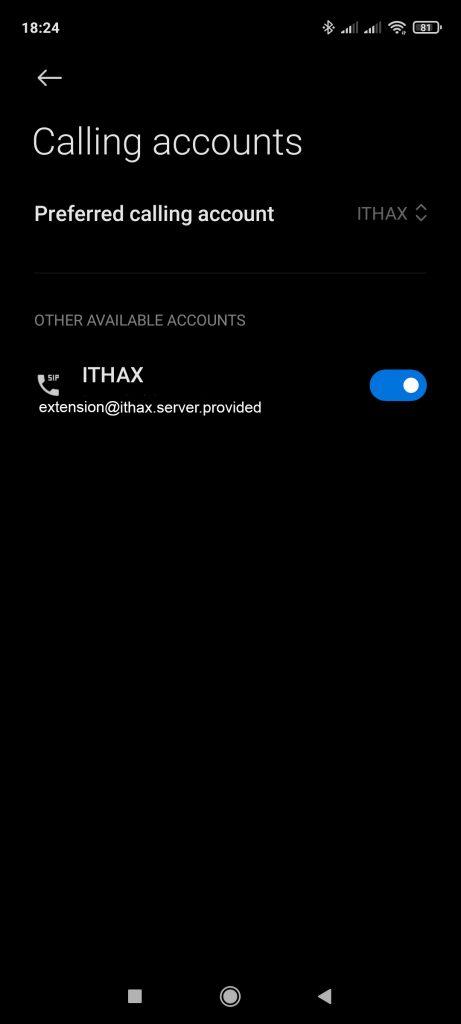
- Make sure you select ITHAX as your preferred calling account
- Make sure that you switch the ITHAX account to ON position, at the “OTHER AVAILABLE ACCOUNTS” section below.
- Go back to the main screen and save settings if asked.
- That’s it, you can now make and receive calls over ITHAX from your native android phone application.
Caution! In some cases, android SIP settings are hidden by the phone manufacturer. In this case you may download the app QuickShortcutMaker in order to make the SIP menu appear in the native phone settings.
For many Samsung Galaxy phones, one may use the very efficient Galaxy SIP Accounts application, which allows for direct setup of SIP accounts directly from the app.
2. Acrobits or Groundwire
- Download Acrobits or Groundwire softphone
- Make sure you accept push notifications when prompted
- Select settings
- Select SIP accounts
- Add a new account
- Title: ITHAX
- Username: your username for ITHAX
- Password: your ITHAX password
- Domain: it will be supplied during registration
- Select advanced settings
- Leave all blank
- Transport protocol: select UDP
- Select Codecs for WIFI
- Make sure you have G711 u-law, G711 a-law, gsm inside “enabled codecs”.
- Scroll down and tick on “Honor remote codecs”
- Press ok
- Select Codecs for 3G
- Make sure you have GSM, G711 u-law, G711 a-law, inside “enabled codecs”. Scroll down and tick on “Honor remote codecs”
- Press ok
- Press ok again
- Press ok again
- Press “back”
- Select incoming calls “keep device awake”
- Press “preferences”
- Press “sound” and enable echo cancellation and noise suppression
- Press back
- Press “other”
- Tick all except “hardware lock”
- Press back
- Press “controls”
- Select “do nothing” on GSM call
- Tick show country flag
- Remove tick on “show gsm button”
- Press back twice
- Select add-ons
- If you wish, Buy G729 codec and enable it for 3G and wifi as before. ITHAX can work without it however.
Kindly note that “Settings” menu is visible through the “keypad” tab only.
3. GS Wave
- Download the application GS Wave form Android Play Store.
- Allow all permissions when asked.
- Go to “Settings”.
- Go to “Account settings”.
- Press the “+” at the top right of the screen.
- Select “SIP account”.
- Select “Account Name”.
- Type “ITHAX” and press ok.
- Select “SIP Server”.
- Type the ITHAX SIP SERVER as it will be provided after registration and press “OK”.
- Select “SIP User ID” and type the extension number, as it will be given to you after registration. Press “OK”.
- Select “SIP Authentication ID”.
- Type the extension number as it will be given to you after registration. Press “OK”.
- Select “Password”.
- Enter the password exactly as it will be sent to you after registration. Press “OK”.
- Make sure that the “Activate Account” check button is set to ON at the top right corner of the screen.
- Press on the Check Symbol at the top right corner of the screen.
- ITHAX account should get a green dot at the right of the name. This means it is registered. If the dot doesn’t turn green after a few seconds, and you are connected to the internet, make sure that you have entered all settings properly.
- Go to Settings >Account (ITHAX) >SIP SETTINGS click on ‘Unregister Before New Registration’ and change to ‘Do Not Unregister’.
- Select “ITHAX” account again.
- Scroll down to “Codec Settings”
- Select “Preferred Vocoder”
- Select “WiFi”.
- Make sure that you PCMU and PCMA are selected.
- Press the check symbol at the top right corner of the screen.
- Select 2G/3G/4G.
- Select G729 and PCMU (drag G729 at the top, above PCMU so that you force codec priority). G729 uses 8 times less bandwidth than PCMU.
- Press the check symbol at the top right corner of the screen.
- Go to back.
- Go back again.
- Select “Advanced settings”.
- Switch off “Edit before dial”.
- Switch on “Start on boot”.
- Go back.
- Select the Keypad button at the bottom center of the screen and you are ready to make calls.
4. Zoiper
- Download ZOIPER IAX SIP VOIP SOFTHPONE application
- press Config icon on the upper right corner of the screen.
- press Accounts
- press Add account
- Account setup, press yes “you already have an account?”
- Account setup press Manual Configuration
- Choose an account type: press SIP
- Sip Account screen. Press on each field to enter the value.
- Account name: ITHAX
- Host: it will be supplied during registration
- Username: your ITHAX username
- Password: your ITHAX password
- Check “enable on start” below
- Press on audio codecs
- Go down and tick on G729 if purchased (if not do nothing)
- Press on G729 and scroll it up in the list so that it is the first in the list. If purchased (if not do nothing)
- Press save
- Go back to settings
- Press connectivity and make sure everything is checked
- Save and go back to settings
- Press on “advanced” and make sure that “start with android” is checked, deselect “send google analytics”
- go back and press on “dialer” icon on the upper left corner of the screen. Check to see the “Registered” sign in green font above keypad.
5. PortGo
- Download app PortGo from Play Store
- Open application
- Insert you user name: your username for ITHAX
- Insert password: your ITHAX password
- Insert SIP server: it will be supplied during registration
- Switch on “Remember me”
- Press on “Show Advanced Options”
- Press on “Names”
- Enter “ITHAX” in “Display Name”
- Go back
- Press on “Sign In”
- You must see the icon of registration on the upper left corner of your screen.
- Press on “Settings”
- Press on “Preferences”
- Switch on “Allow Voip Calls”
- Leave the rest as they are.
- Go back
- Press on “Codecs”
- Switch on “G.729”, “PCMA”, PCMU”, “GSM” in the audio codecs section. Switch off all the rest
- Switch on “H.263+”, “H.264”, “VP8” in video section. Switch “H.263” off.
- Go back
- Press on Numpad.
- You can use your contacts directly.
- Please make sure that you open the application following any restart of your mobile phone. Otherwise you will not be able to receive calls.
6. Linphone
Select “enable push notifications” (this saves on battery for receiving calls). In case you have difficulty receiving incoming calls, deselect it. In iPhone it has to be always selected.
Download Linphone and install it.
On the “welcome” message press “Let’s go”
In the “account setup assistant” press “I already have a SIP account”
Insert your username: your ITHAX username
Insert your password: your ITHAX password
Insert domain: it will be supplied during registration
Press apply
Your account will show “registered”.
In Preferences deselect “enable video”
Select “audio”
Deselect all codecs except PCMU, PCMA, GSM
Go back to “advanced”
Select “background mode” (if not already selected)
Select “start at boot time”
Go back to Network settings
